4 June 2019

How to listen to YouTube videos in background

Don't want to read? Ok no problem Watch this video tutorials here

(Be sure to enable notification for chrome browser)

Step 1: open chrome
Step 2: goto YouTube.com
Step 3: Search the song/playlist you want to listen on background (I suggest you search for playlist)
(let it load)
Step 4: when it starts playing the song minimize chrome.
(at this point your song might stop playing if it stops playing goto step 5)
Step 5: pull down notification bar.
(Here if you don't see any notification then please enable chrome notification on settings)
Step 6: press play.

Enjoy the song.

Note: Your song will keep on playing even after your screen is lock.

YouTube link:
https://youtu.be/ARmvyfj5-hQ

Read More »

16 September 2018

Tangkhul madlipz download links

...................................................................................Sign up Google pay now and get Rs. 151 when you first make your transaction of Rs. 1.
..................................................................................

You can get all videos links for tangkhul madlipz here.
Mr. Bean Vs chaplin
Download

Episode 1
Download 1 Download 2 Download 3 Download 4

Episode 2
Download 1 Download 2 Download 3 Download 4
Download 5 Download 6 Download 7 Download 8

Episode 3
Download 1 Download 2 Download 3

Episode 4
Download 1 Download 2 Download 3 Download 4

...................................................................................Sign up Google pay now and get Rs. 151 when you first make your transaction of Rs. 1.
..................................................................................
Episode 5
Download 1 Download 2 Download 3 Download 4

Episode 6
Download 1 Download 2 Download 3 Download 4

Episode 7
Download 1 Download 2 Download 3 Download 4

Episode 8
Download 1 Download 2 Download 3 Download 4
...................................................................................Sign up Google pay now and get Rs. 151 on your first  transaction of Rs. 1.
..................................................................................

Episode 9
Download 1 Download 2 Download 3 Download 4

Episode 10
Download 1 Download 2 Download 3 Download 4

Episode 11
Download 1 Download 2 Download 3

Episode 12
Download 1 Download 2 Download 3 Download 4
Download 5
...................................................................................Sign up Google pay now and get Rs. 151 when you first make your transaction of Rs. 1.
..................................................................................
Episode 13
Download 1 Download 2 Download 3 Download 4

Episode 14
Download 1 Download 2 Download 3 Download 4

Episode 15
Download 1 Download 2 Download 3 Download 4

Episode 16
Download 1 Download 2 Download 3 Download 4
...................................................................................SignGoogle pay now and get Rs. 151 when you first your transaction of Rs. 1.
..................................................................................

Episode 17
Download 1 Download 2 Download 3 Download 4

Episode 18
Download 1 Download 2 Download 3 Download 4

Episode 19
Download 1 Download 2 Download 3 Download 4

Episode 20
Download 1 Download 2 Download 3 Download 4
...................................................................................Sign up Google pay now and get Rs. 151 when you first make your transaction of Rs. 1.
..................................................................................

Read More »

31 March 2018

Onead android app join our network and increase your network too

...................................................................................Sign up Google pay now and get Rs. 151 when you first make your transaction of Rs. 1.
..................................................................................
Download app here.
Use referral code: Y7Y43E
Join my network by using my refer code and
We will also help you increase your network  comment your refer code below.

We will change the above "refer code" every month according to the "refer code" commented below.

A Lockscreen App, which offers you the double advantage, EARN + SAVE money!

Now how do you make money?
Simple by referring the app to your friends. You get referral money for each active member in your network. Making money up to 2.5 Lakhs every month had never been simpler. HAPPY EARNING!
...................................................................................Sign up Google pay now and get Rs. 151 when you first make your transaction of Rs. 1.
..................................................................................
All your network members also benefit from the same referral program. Your daily income and network members can be seen on the OneAD app. You can redeem the money directly to your bank account.

It works on the simple principle of "Sharing Happiness".

Download app here.

...................................................................................Sign up Google pay now and get Rs. 151 when you first make your transaction of Rs. 1.
..................................................................................
Use referral code: Y7Y43E
Join my network by using my refer code and comment your refer code below we will help you increase your network too.
We will change the above "refer code" every month according to the "refer code" commented below.

Note: we will change the refer code every month according refer code  commented below

...................................................................................Sign up Google pay now and get Rs. 151 when you first make your transaction of Rs. 1.
..................................................................................

Read More »

20 April 2017

How To Enable or Add Immersive Mode in Lineage OS 14 or Other Nougat or Android 7 Roms in Notification Tiles | Root Needed | Hide Notification Bar and Navigation Bar

In my Lineage OS 14 official ROM, there is no notification tile for Immersive mode / Expanded desktop to hide the status bar or navigation key bar.

I can go to Settings-Display-Expanded desktop and enable it permanently or choose custom settings for a specific app. But, this is inconvenient.


And check Expanded desktop on the app. Then, in your full notification page (swipe down from status bar twice), select the pen/edit icon.
Go to the bottom and drag Immersive Mode tile from the bottom section to the top section.
Click on the tile and allow Root access. And select the option you want, Only hide status bar, or show status bar, hide all or show all.


Read More »

16 April 2017

How To Mirror Your Android Device To PC/Chrome/VLC for MAC OSX, Windows Linux | No root needed

There are many ways in which you can mirror your android device to your PC in Mac OS, Windows, and Linux. I am listing some methods without the need for rooted android device.

Method One: Using Screen Stream Mirroring App


App:
- Screen Stream Mirroring Free Version : Try this free version first.

Web Browser Method:


1. Open the app and enter the URL link for mirror given in the app on your PC browser. If this doesn't work due to some unknown problem, then try the next one with VLC media player on your PC.


VLC method


1.  On the left menu side bar, select VLC media player / OBS. Enter the address like tcp:192.168.1.5:5000 on your VLC (Menu>Open Network Stream>Enter the Network URL>Play). See pics below for how to.


Use USB cable to Mirror


1. To use your your usb cable instead of wifi to mirror your android device to chrome/web browser/vlc you will need to download a file from http://mobzapp.com/mirroring/usb-tool-download.html for Windows/MAC OSX/ Linux.

Then extract the compressed file and open the Start.bat file depending on your OS.


Connect your phone to your PC. On Screem Stream Mirroring app, go to settings and check Stream through USB option.


On your phone, allow USB debugging.


You should be done. Just enter the stream URL on your Web Browser or VLC depending on the method you use like the one in method one or two. 


There are other apps that you can try if you feel this one is not for you. There are others available, but some work and some don't. It depends on your device.

I'll post some other apps if I find them and they work.

Read More »

15 April 2017

How To Make Your Rooted Android Device as Bootable Pendrive For Windows or Other OS installation

As the title suggests, you can make your rooted android as a bootable drive for installing operating systems. This method creates an IMG file on your android and use that IMG file like a pendrive/usb drive/ disc.

In this tutorial, I will be going through the windows 10 installation using your android phone.

Disclaimer: Please do it at your own risk. I am not accountable.

Things needed:


2. Your device must be rooted
3. The disc image of the os you want to install. I got a windows 10 official iso from this link. (Change your browser user agent to mobile and you will be able to download this in pc).
4. Rufus for make a bootable drive.


Step 1 to 6 is testing if it will work on your android rooted phone.

Steps

1. First of all, you need to install the DriveDroid app and test if it works on your device. Open the app and you will a screen line below. Select Setup. And the Proceed


2. In the next page allow root permission. Click Acquire Root. And allow root permission access. 


3. Plug in the usb cable to your pc and then select on of the three options. I chose Standard Android

4. Right after you select one of the three above, go to your PC and check if there is a new drive or disc. In my case a new drive G comes up. I select I see a usb drive, proceed


5. Now, reboot your pc and go to bios settings and set boot priority to usb drive first. In my case it shows up as USB HDD LINUX FILE-CD GADGET. This is for testing purpose before the real installation takes place. I can enter in my bios pressing DEL key when restarting. Advanced bios features: Boot priority.

Set you usb hdd in the first order. Save it and then reboot. Hopefully, it boots to a new page of DriveDroid other than the normal os you have. Shutdown pc and restart and go to next step.


6. If uptill here, there is no problem and it is working fine, then you can proceed. Now, this time we will make the bootable installation drive.

7. Create an img file in DriveDroid. The size depends on the os you want to install. My windows 10 iso file was around 4.1 gb. So, i created 4.2 gb img file.

Select Create blank image.


8. Uncheck partition table mbr. Or keep settings like mine in the picture below. But, change the size of the MB depending on your need. 


Once you click the correct icon, it will create the img file. Since mine is more than 4gb it took a minute or two.


9. Now click the img file you created and host it. I selected USB write since we will be flashing the windows iso file. See picture below.


Once done, a new drive will appear in your pc. If it shows without any storage indicator, it's fine.


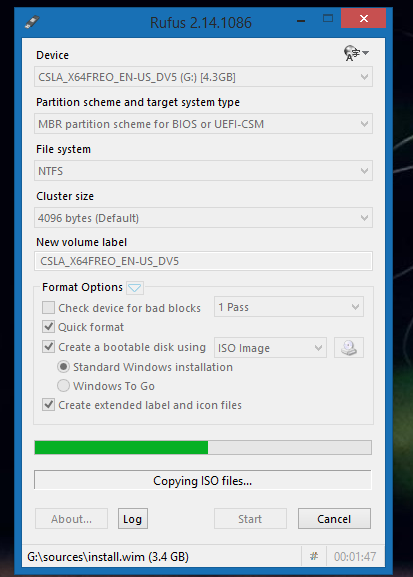
10. Now, install rufus and open it.

In Device, make sure the drive letter corresponds to the correct one. 
I use MBR partition so I chose MBR.
I used NTFS. But Fat32 will also work.

Then next to ISO image, I select the source iso (windows 10 64 bit iso that I downloaded).
I select STANDARD WINDOWS ISTALLATION

Then, I click START.


10. Once done or successful. Close rufus. And then reboot your pc and go to bios settings. And set boot priority first to usb hdd (or other depending on your phone). 

Once booted, you can install your os like any normal os.


Read More »

4 April 2017

Redmi Note 3 Antutu Score Test with 2 or 4 or 6 cores on | Hotplugging

Redmi Note 3 with Snapdragon 650 has been a very good device for me. I like that it has a very good battery back up.

But, I want to extend it as much as possible. So, I'm going to try to turn off some cores and try how much it scores in Antutu. For now, I'm going to check how it scores in Antutu. Battery update will come later.


Snapdragon 650 has 2x ARM Cortex A72, and 4x ARM Cortex A53, a total of 6 cores.

Rom I'm using

2. Kernal: Radon V4.3 battery mode
3. Gapps: opengapps pico 

Only keeping the 4 Cortex 53 on may help a lot in battery but reduced performance. I don't mind keeping only 2 Cortex 53 on if it gives me much more battery. Going to test more. But, see the benchmarks for now.

Benchmarks | note: the kernel is on battery mode and not balanced or performance

1. 2 ARM Cortex 53 cores enabled | the rest disabled


With this setup, I got around 10 hours of screen on time with about 16% left.
WiFi on the whole time.
1 and 1/2 hours of calls.
Dual sim: Jio 4g and Vodafone.
YouTube and Chrome mostly used.


Keeping only two cores on, I saw some lag when browsing in chrome. But, usable.

Screenshot of usage history


2. 4 ARM Cortex 53 cores enabled | the rest disabled


3. All cores on :


All cores enabled. Kernel on balanced mode


4. Only 1 ARM Cortex53 on and 2 ARM Cortex 72 on | the rest disabled


Read More »