As the title suggests, you can make your rooted android as a bootable drive for installing operating systems. This method creates an IMG file on your android and use that IMG file like a pendrive/usb drive/ disc.
In this tutorial, I will be going through the windows 10 installation using your android phone.
Disclaimer: Please do it at your own risk. I am not accountable.
Things needed:
1. Drivedroid
2. Your device must be rooted
3. The disc image of the os you want to install. I got a windows 10 official iso from this link. (Change your browser user agent to mobile and you will be able to download this in pc).
4. Rufus for make a bootable drive.
Step 1 to 6 is testing if it will work on your android rooted phone.
Steps
1. First of all, you need to install the DriveDroid app and test if it works on your device. Open the app and you will a screen line below. Select Setup. And the Proceed
2. In the next page allow root permission. Click Acquire Root. And allow root permission access.
3. Plug in the usb cable to your pc and then select on of the three options. I chose Standard Android.
4. Right after you select one of the three above, go to your PC and check if there is a new drive or disc. In my case a new drive G comes up. I select I see a usb drive, proceed.
5. Now, reboot your pc and go to bios settings and set boot priority to usb drive first. In my case it shows up as USB HDD LINUX FILE-CD GADGET. This is for testing purpose before the real installation takes place. I can enter in my bios pressing DEL key when restarting. Advanced bios features: Boot priority.
Set you usb hdd in the first order. Save it and then reboot. Hopefully, it boots to a new page of DriveDroid other than the normal os you have. Shutdown pc and restart and go to next step.
6. If uptill here, there is no problem and it is working fine, then you can proceed. Now, this time we will make the bootable installation drive.
7. Create an img file in DriveDroid. The size depends on the os you want to install. My windows 10 iso file was around 4.1 gb. So, i created 4.2 gb img file.
Select Create blank image.
8. Uncheck partition table mbr. Or keep settings like mine in the picture below. But, change the size of the MB depending on your need.
Once you click the correct icon, it will create the img file. Since mine is more than 4gb it took a minute or two.
9. Now click the img file you created and host it. I selected USB write since we will be flashing the windows iso file. See picture below.
Once done, a new drive will appear in your pc. If it shows without any storage indicator, it's fine.
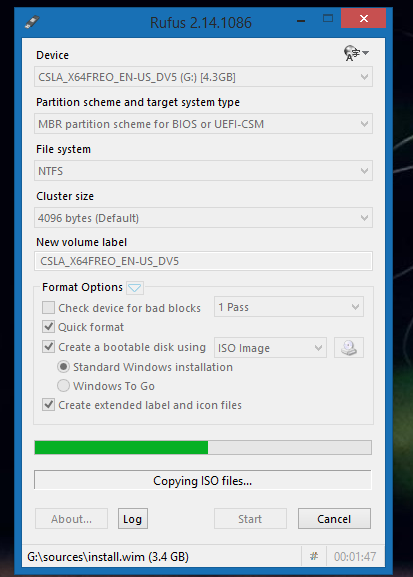
10. Now, install rufus and open it.
In Device, make sure the drive letter corresponds to the correct one.
I use MBR partition so I chose MBR.
I used NTFS. But Fat32 will also work.
Then next to ISO image, I select the source iso (windows 10 64 bit iso that I downloaded).
I select STANDARD WINDOWS ISTALLATION
Then, I click START.
10. Once done or successful. Close rufus. And then reboot your pc and go to bios settings. And set boot priority first to usb hdd (or other depending on your phone).
Once booted, you can install your os like any normal os.


No comments:
Post a Comment