CISS is a system for printer to enable basically unlimited printer without the need to refill a cartridge again and again. With this system, you can print as long as you have ink in the system.
There is a picture attached below. That is ciss ( continuous ink supply system). You connect it to a cartridge and then you can print as long as you have ink in the system.
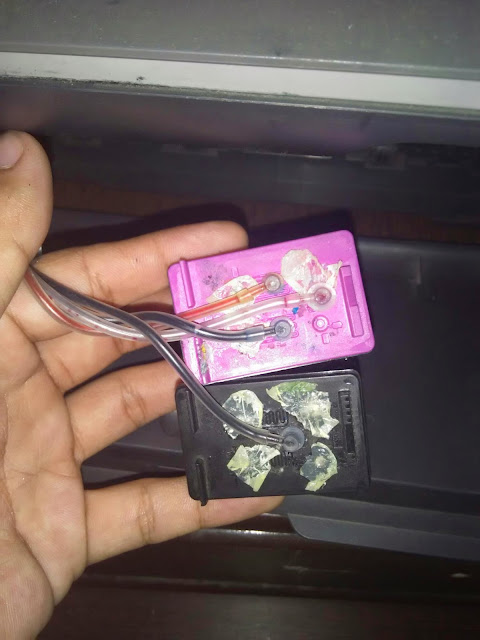
I have installed CISS on my Hp 1050 printer with 802 Hp cartridge. Pictures are below.
For almost all inkjet printers you can install ciss. Look up for your cartridge if there is ciss tutorial of installation. Better YouTube it.
See the pictures below!
Installation of ciss tutorial/ how to install ciss tutorial.
1. Buy the Ciss Kit like in the first picture. I got mine for Rs.600 or $10 from ebay. Specifically read the compatibility of your printer and cartridge with ciss.
2. First make holes in your cartridge with the screw. For my printer I made four holes. That's where the pipes will go. Some cartridges may need to make new hole because it my be completely sealed at first. Some may already have the holes open already. Or some may have to make it a little bigger. Some cartridges may have more than four colors and may need more holes depending on the ciss. Just look up the points where you will have to drill for the pipes. Make sure you drill the right hole.
3. After drilling the hole where the right colors are, you have to seal the other holes, so as to make it airtight. Mine didn't come with the sealer, so I applied some clue and made it airtight. Those yellow color plastics in the last picture are the holes that I sealed.
4. For those holes where the ink would go, you will need to put caps there. Those four white caps in the first picture will help make it air tight when the ciss pipes are put inside the cartridge.
5. Your initial set up is done after putting the white caps
6. Now, before you go a step further, make sure that your cartridge already has been refilled or is in new condtion. If it has not been refilled or is empty, just refill it and make sure that you use the suction tool to suck out some ink from the bottom of the cartridges. You need to do that every time you refill and empty cartridge.
7. Now fill ink in your ciss and keep the pipes at a higher level so as not to spill ink at yourself.
8. Bring down the pipes to a lower level. The pipes will be filled with ink and slowly before the ink overflows from the mouth, a few inches before, put it in the holes of the cartridges respectively.
9. After putting all the pipes, put the colored Caps and close the holes in your ciss. (See the pictures)
10. Take a tissue, wipe the bottom of the cartridges softly. See if ink is freely flowing from the bottom of the cartridges. If not then, it is done right. Just put the cartridge in your printer back. If it oveflows from the bottom, just wipe the tissues and wait and put back when it doesn't overflow.
11. Now, take the object no @ (see pic) and put it where the printer cartridge can move freely about while printing. Different location for different printer. Mine is like in the picture.
12. Start printing. Thanks.


